Using a Repeater to render a Wordpress Menu - Part 2
by rob
oxygenbuilder, css, js, wordpressThis is part 2. Part 1 can be found here
At the end of part 1, we were able to:
- Make the query to fetch
nav_menu_items for a given menu. - Create helper functions for those items to get fields like title, url, and the
object_id. - Use those helper functions to build a menu with a repeater.
However, that process was only limited to a menu that is only one level.
This is how you do more than 1 level, up to 3 levels anyway, so a Top menu items, the sub menu items, then 1 more level under that.
Let’s Go
Note: Again this guide assumes you are somewhat familiar with the workings of Wordpress and OxygenBuilder.
Step 1 - Create a Menu
Create your menu like before. I will continue using the Fighter custom post type I used in the previous guide.
This time, make the menu a multi-level one. Here we have put the Fighters under different headings, the headings are “Custom Links” that have “#” as the URL. This is fine if you don’t need the headings to go anywhere.
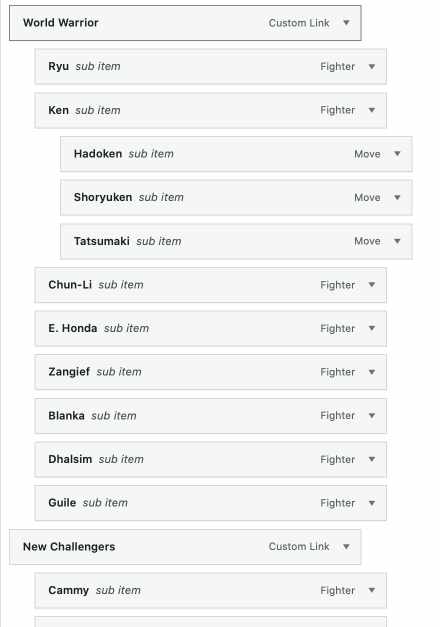 |
|---|
| Multi Level Menu |
Step 2 - The Query Again
Do the same thing as in part 1
Here is the query again, replicate it with the Advanced Query builder.
nav_menu_item Query
$args = array(
  'post_type'       => 'nav_menu_item',
  'tax_query'       => array(
                         'taxonomy' => 'nav_menu',
                         'field'    => 'slug',
                         'terms'   => array( 'fighter_menu' )
                       ),
  'orderby'         => 'menu_order',
  'order'           => 'asc',
  'posts_per_page'  => 999
);
As before, create your repeater and set the Advanced query with those criteria.
Step 3 - Helper Functions
Just like part 1, create the helper functions to access the nav_menu_item’s title, url, and featured image using the object_id.
Here they are again, with a change to the get
Get Menu Item Title function
function get_menu_item_title() {
	global $post;
	$menu_item = wp_setup_nav_menu_item( $post );
	if( isset( $menu_item->title ) ) {
		return $menu_item->title;
	} else {
		return 'Menu Title';
	}
}
Get Menu Item URL function
function get_menu_item_url() {
	global $post;
	$menu_item = wp_setup_nav_menu_item( $post );
	if( isset( $menu_item->url ) ) {
		return $menu_item->url;
	} else {
		return '#';
	}
}
Get Menu Item Featured Image function
function get_menu_item_featured_image() {
	global $post;
	$menu_item = wp_setup_nav_menu_item( $post );
	$default_url = 'https://placekitten.com/200/200';

  if( isset( $menu_item->object_id ) && has_post_thumbnail( $menu_item->object_id ) ) {
		$thumbnail_id = get_post_thumbnail_id( $menu_item->object_id );
		if( isset( $thumbnail_id ) ) {
			$img_object = wp_get_attachment_image_src( $thumbnail_id, 'thumbnail' );
			if( isset( $img_object ) ) {
				$default_url = $img_object[0];
			}
		}
	}
	return $default_url;
}
There is 1 more helper function that we need to add for multi-level menus. If you did a var_dump of the post from the nav_menu_item query, there are other values available in the post object.
The one we are after is menu_item_parent. This is the menu item’s parent’s ID. 0 if it is a top-level item.
Get Menu Item Parent
function get_menu_item_parent() {
	global $post;
	$menu_item = wp_setup_nav_menu_item( $post );
	return $menu_item->menu_item_parent;
}
The Repeater
Give the repeater a class mega-menu, we use this in the jQuery to select it.
For the main item, I suggest giving it a class like menu-item and having 2 divs inside it.
First div (call it menu-item__contents or something) will be for the contents of the repeater, like its title, icon, text, etc.
Second div (call it menu-item__container or something) will be for any sub-items that it may have.
Add the contents to the main repeater div as usual and use the helper functions for the title, image, and url parts of the element.
As for the menu_item_parent variable, we’ll store it in a data-attribute.
Add a new Attribute named data-menu-parent to the first div in the repeater and set the value to be Dynamic Data > PHP Function Return Value for the function get_menu_item_parent.
Add another attribute named data-menu-item-id and its value should be Post ID from Dynamic Data.
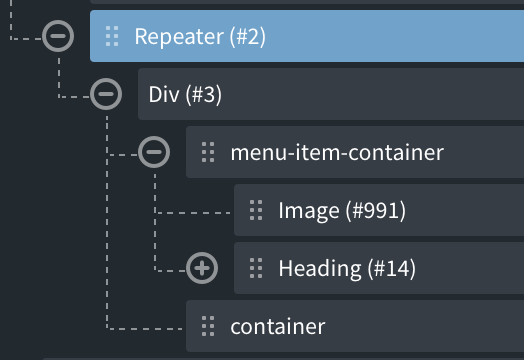 |
|---|
| Repeater layout |
This is what your div in the repeater should look like.
Step 4 - The Process
When the query is run with order as ASC and order_by as menu_order, the objects are returned in the order that they appear in the menu and any sub-items are returned before the next top level item. Like in this crude diagram.
Home (1)
Brands (2)-
          |- Honda (3)
          |- Toyota (4)-
                       |- (5) Parts
          |- Mazda (6)
Branches (7)-
            |- New York (8)
            |- New Jersey (9)
Contact Us (10)
So if we ran the repeater without any scripts or CSS it will look like this:
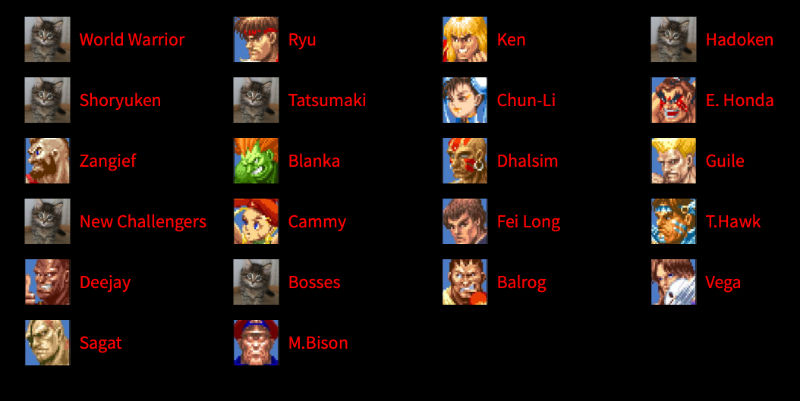 |
|---|
| Repeater of all Items without JS |
Notice the items after “Ken” are his “Moves”, they are a second level sub-menu.
Since the sub-menu items will have the menu_item_parent stored in a data-attribute, the workflow for the script would be:
- Get the value of current menu item’s
data-menu-parentattribute.- If it is 0, then proceed normally since it does not have a parent and is a top level item.
- If it is not 0, then find the
menu-itemdiv with thedata-menu-item-idthat matches the current menu item’s parent ID, and add this item to the parent container.
- Go to next item.
Add a Code Block and add the following code. You can either put it in the PHP/HTML section inside script tags or directly in the Javascript section.
Javascript to move menu items
jQuery(document).ready(function(){
	jQuery('.mega-menu > div').each(function() {
		const currItem = jQuery(this)
		const currItemParentId = currItem.data('menuParent') // get data attribute named data-menu-parent
		if(currItemParentId != 0) { // then this is a sub-item
			// get parent element
			const parentElement = jQuery('div[data-menu-item-id="'+ currItemParentId +'"]') // get this currItem's parent div
			if(!parentElement.hasClass('has-sub-menu')) {
				parentElement.addClass('has-sub-menu') // parent element will have a sub-menu so add the class to help with styling
			}
			const container = parentElement.find('.menu-item__container').first() // find the parent element's container
			currItem.appendTo(container) // add this current item to its parent's container
		}
	})
});
After that, refresh the page and the menu should now look like this
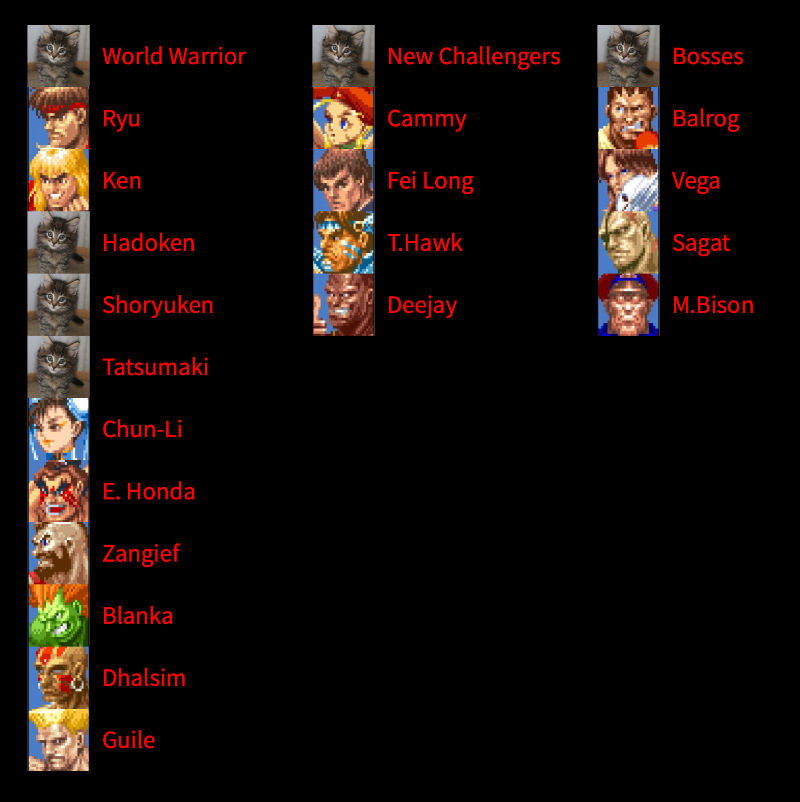 |
|---|
| Repeater after script runs |
The menu should be laid out where the menu headings are up top and their sub menus are inside (below) of them.
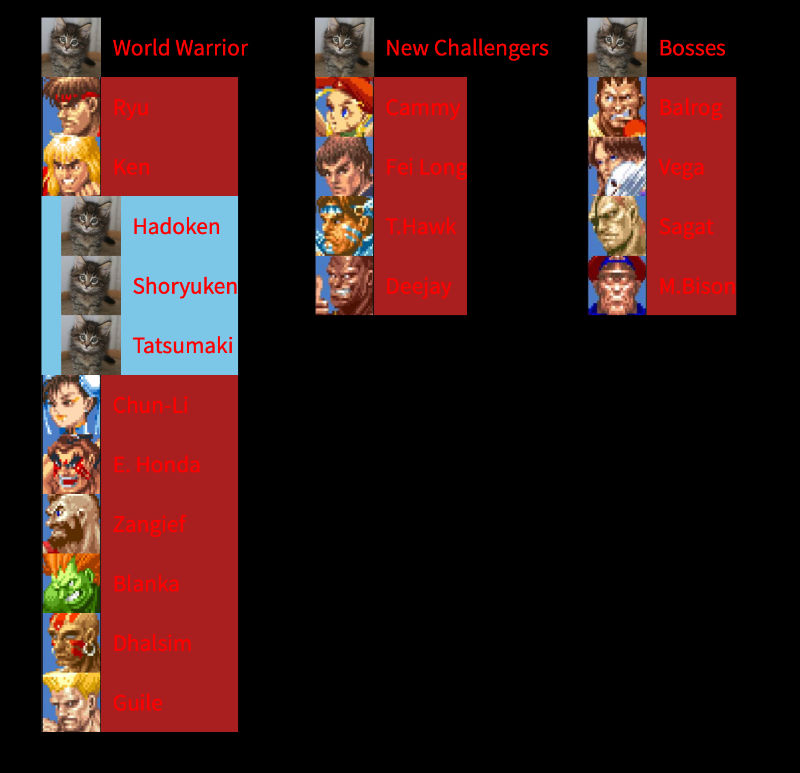
I add some CSS to highlight the container hierarchy that I will go into more detail later.
.menu-item > .container {
	background-color: firebrick;
}

.menu-item > .container > .menu-item > .container {
	padding-left: 20px;
	background-color: skyblue;
}
 |
|---|
| Repeater with containers highlighted |
Top Level items are at the top
Sub-Menus are in firebrick red
And the Sub-Sub Menus are in skyblue
The work is pretty much done, just need some CSS to style everything, use specific selectors to add display: none to some parts and :hover effects to others. You can also select the individual titles to style the text differently.
Step 5 - The Menu
I’m actually not going to go in depth you how to do this as there are already better resources online, like Oxygen’s own tutorial: Custom Dropdown Megamenu In WordPress Using Oxygen on YouTube.
However I will go through my own process.
The Rest of the f#$%ing Owl
I add the following CSS to the Code Block
Mega Menu CSS
.menu-item {
	width: 100%;
	position: relative;
	margin-right: 20px;
	padding-left: 20px;
	transition: outline 0.1s linear;
}

.menu-item__container:after {
	display: none;
	color: red;
	align-self: center;
	padding-left: 10px;
}

.menu-item > .menu-item__container:after {
	content: '\25BF';
}

.menu-item > .container > .menu-item > .menu-item__container:after {
	content: '\25B9';
}

.has-sub-menu > .menu-item__container:after {
	display: inline-block;
}

.menu-item > .menu-item__container > img,
.menu-item > .container > .menu-item > .container > .menu-item > .menu-item__container > img {
	display: none;
}

.menu-item > .container > .menu-item > .menu-item__container > img {
	display: block;
}

.menu-item:hover {
	outline: 3px solid red;
	outline-offset: -3px;
}

.menu-item > .container {
	background-color: darkslategrey;
	width: auto;
	max-height: 0px;
	position: absolute;
	top: 100%;
	left: -3000px;
	transition: max-height 0.3s ease-in;
}

.menu-item:hover > .container {
	max-height: 10000px;
	left: 0%;
}

.menu-item > .container > .menu-item > .container {
	background-color: darkgreen;
	width: 100%;
	max-height: 0px;
	position: absolute;
	top: 0%;
	left: -3000px;
}

.menu-item > .container > .menu-item:hover > .container {
	max-height: 10000px;
	left: 100%;
}
It does the job but it’s horrible to read.
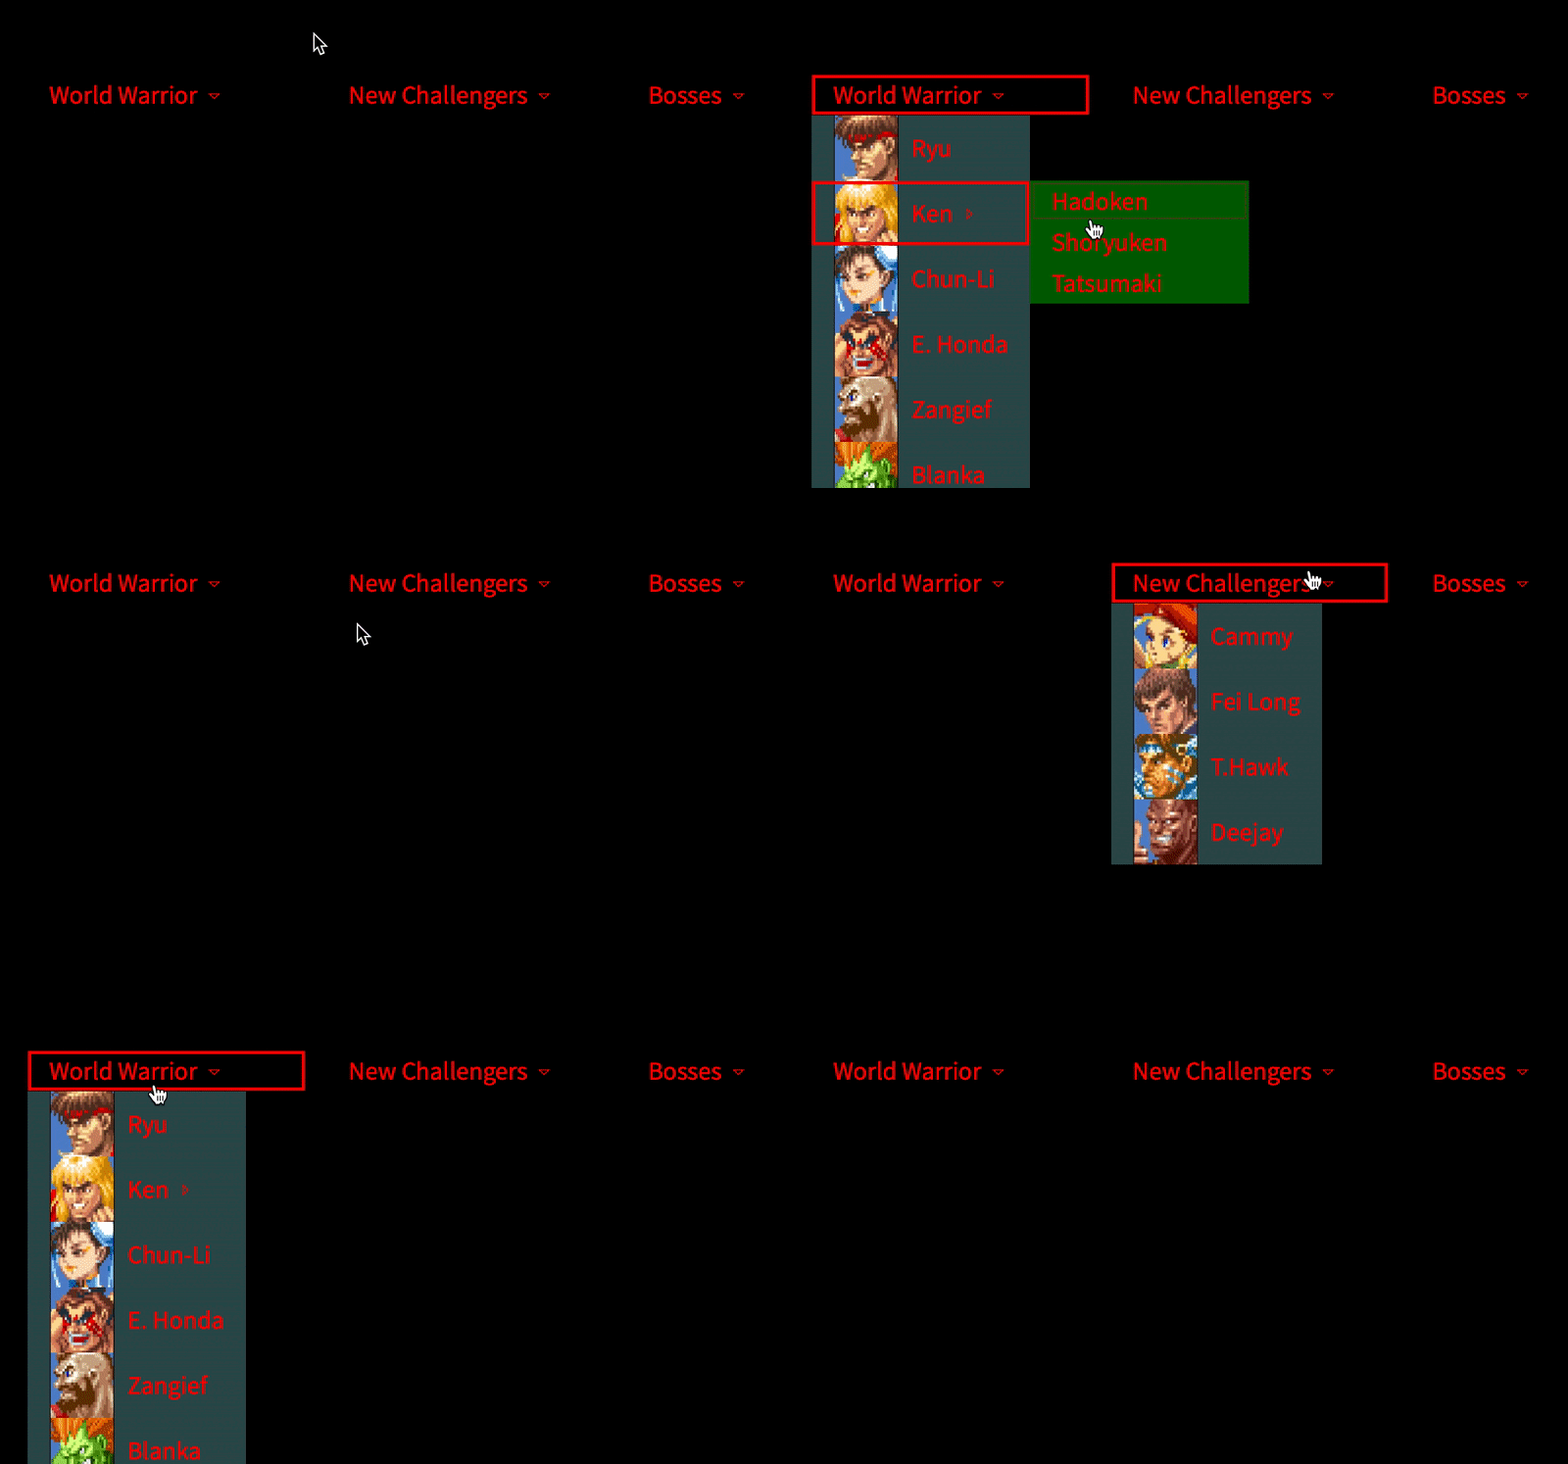
Below is the finished menu, if you’ve got the gist of it then you can probably go and do your own thing. There is a more legible way though.
 |
|---|
| Finished Menu with some styling |
The Other Way
This involves modifying the jQuery to add and remove classes to the various elements in order to better organise everything. Then we can work directly with the class names rather all the child combinator selectors, easier to read, easier to style.
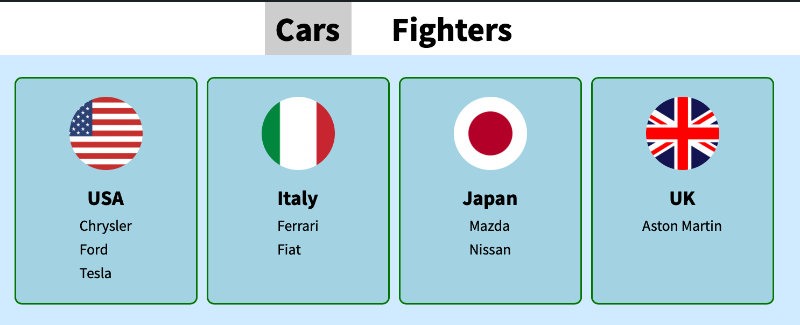
Rather than re-make the same menu except with some class name changes, I made a “real” mega menu with the full width sub-menus
 |
|---|
| Mega Menu |
Firstly, the Countries are actually a custom taxonomy (Country) that I use for the 2 different post types. For that taxonomy, I used Advanced Custom Fields and added an image field that was the flag. To get this flag image from the post I wrote another helper function.
Get custom flag field from custom taxonomy
function get_tax_flag_image() {
	global $post;
	$menu_item = wp_setup_nav_menu_item( $post );
	$default_url = 'https://placekitten.com/200/200';
	if( isset( $menu_item->object_id ) ) {
		$image_id = get_field( 'flag', 'term_' . $menu_item->object_id );
		if( isset( $image_id ) ) {
			$img_object = wp_get_attachment_image_src( $image_id, 'thumbnail' );
			if( isset( $img_object ) ) {
				$default_url = $img_object[0];
			}
		}
	}
	return $default_url;
}
Here is the layout for the main repeater item.
Layout of a single Menu Item
repeater-item (div)
  repeater-item__contents (div)
    repeater-item__img-holder (div)
      repeater-item__img (img)
    repeater-item__title (heading)
  repeater-item__container (div)
JQuery I use to keep track of some variables and add/remove classes to the ones for the different level of the menu.
jQuery with add/remove classes
jQuery(document).ready(function(){
	// Used to keep track of the grandparent id
	let grandparentId = 0
	jQuery('.mega-menu > div').each(function() {
		const currItem = jQuery(this)
		const currItemParentId = currItem.data('menuParent')

		if(currItemParentId == 0) {
			currItem.addClass('first-row-item')
		} else {
			const parentElement = jQuery('div[data-menu-item-id="'+ currItemParentId +'"]')
			const container = parentElement.find('.repeater-item__container').first()

			let newClass = ''
			grandparentId = parentElement.data('menuParent')

			// current element's parent's parent (grandparent) is a top level element
			if(grandparentId == 0) {
				newClass = 'second-row-item'
				if(!container.hasClass('first-row__container')) {
					container.addClass('first-row__container')
				}

				if(!parentElement.hasClass('has-sub-menu')) {
					parentElement.addClass('has-sub-menu')
				}

			} else { // current element's grandparent is not a top-level element, therefore pop-out-item
				newClass = 'third-row-item'
				if(!container.hasClass('second-row__container')) {
					container.addClass('second-row__container')
				}

				if(!parentElement.hasClass('has-sub-menu')) {
					parentElement.addClass('has-sub-menu')
				}
			}

			currItem.addClass(newClass)
			currItem.appendTo(container)

		}
	})
});
Now we can use more legible CSS to style things.
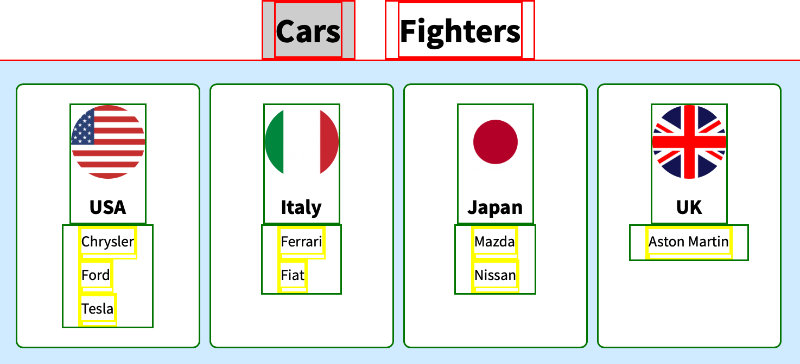
I name the classes with different row numbers to help visualise the menu.
Re-written CSS with more descriptive rules
.mega-menu {
	width: 100%;
	display: flex;
	align-items: flestart;
	justify-content: center;
	background-color: white;
	position: relative;
}

/* hide stuff */
.first-row-item > .repeater-item__contents > .repeater-item__img-container,
.third-row-item > .repeater-item__contents > .repeater-item__img-container {
	display: none;
}

.repeater-item {
	padding-left: 10px;
	padding-right: 10px;
}

.first-row-item > .repeater-item__contents a {
	color: inherit;
}

.first-row-item {
	display: flex;
	fledirection: column;
	align-items: center;
	justify-content; center;
	color: darkslategrey;
}

.first-row-item:hover {
	background-color: lightgrey;
	color: white;
}

.first-row-item > .first-row__container {
	position: absolute;
	left: 0;
	right: 0;
	top: -1000%;
	width: 100vw;
	padding: 24px;
	background-color: lightcoral;

	display: grid;
	justify-content: center;
	align-items: start;
	grid-template-columns: repeat(auto-fit, minmax(200px, 200px));
	grid-column-gap: 10px;
	grid-row-gap: 20px;
	grid-template-rows: minmax(min-content, 1fr);

	opacity: 0;
	transition: opacity 0.3s ease-in;
}

.first-row-item:hover > .first-row__container {
	opacity: 1;
	top: 100%;

}

.second-row-item {
	width: 100%;
	height: 100%;
	background-color: lightblue;
	padding: 20px;
	border-radius: 8px;
	border: solid 2px red;
}

.second-row-item > .repeater-item__contents {
	display: flex;
	width: 100%;
	fledirection: column;
	align-items: center;
	pointer-events: none;
}

.second-row-item > .repeater-item__contents a {
	font-size: 1.4rem;
	color: darkslategrey;
}

.second-row-item > .repeater-item__contents > .repeater-item__img-container {
	position: relative;
	width: 100px;
	padding-top: 100px;
	border-radius: 100px;
	overflow: hidden;
}

.second-row-item > .repeater-item__contents > .repeater-item__img-container img {
	position: absolute;
	top: 0;
	width: 100%;
}

.third-row-item > .repeater-item__contents .repeater-item__title {
	font-weight: 500;
	font-size: 1rem;
	color: blue;
}

/*

.first-row-item, .first-row-item > * {
	border: solid 2px red;
}

.second-row-item, .second-row-item > * {
	border: solid 2px green;
}

.third-row-item, .third-row-item > * {
	border: solid 2px yellow;
}

*/
Slightly better to read.
I had initially done the styling partially in Oxygen and the hover stuff in CSS but then I realised I couldn’t easily copy the styling from Oxygen UI to this post so I kind of reproduced it here. It won’t look exactly like my screenshots or gifs but you get the idea.
I added some borders with the bottom CSS that is commented out to get the following.
 |
|---|
| Menu with Borders |
And it works like so
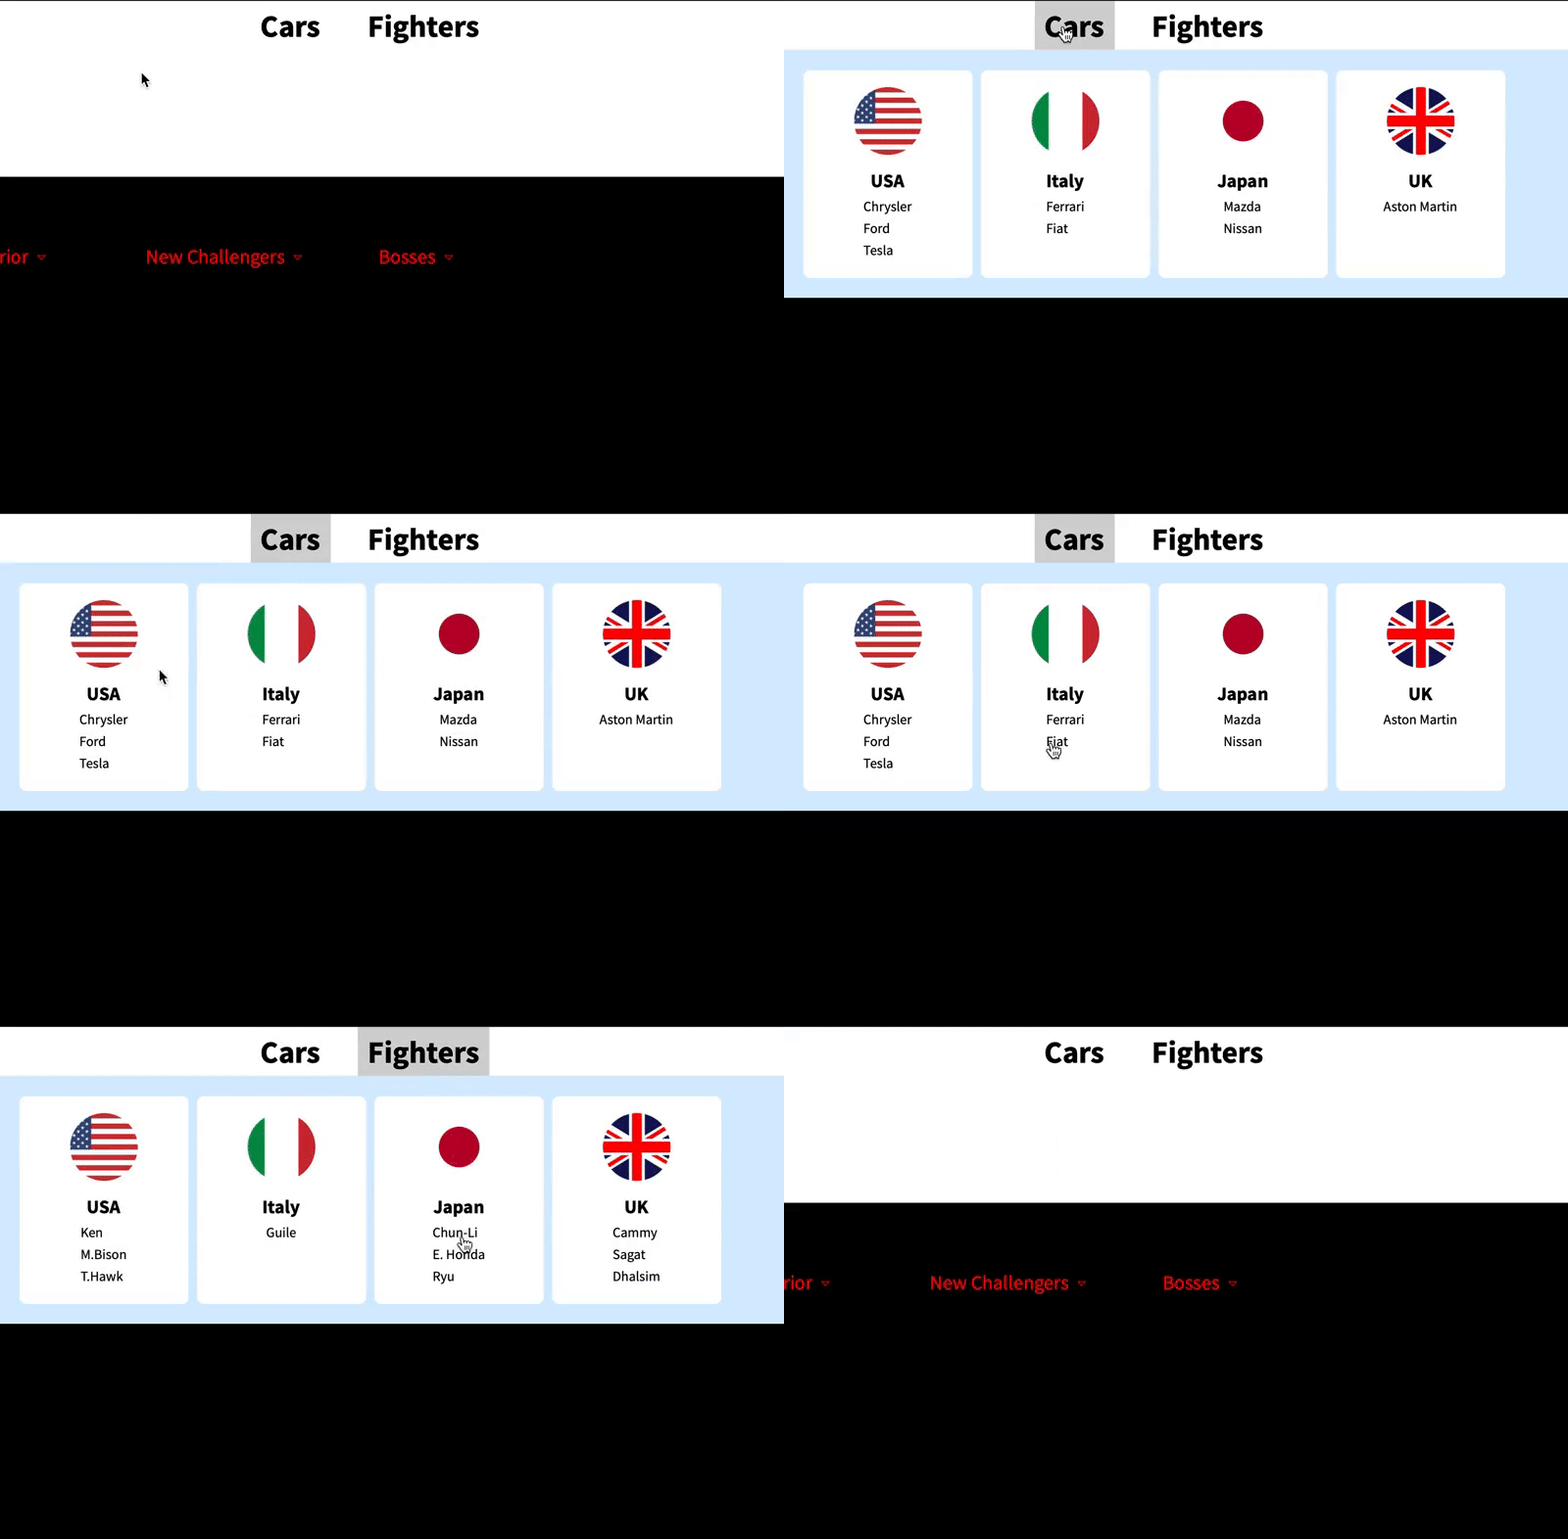 |
|---|
| Mega Menu Gif |
Issues
There are some considerations that was not an issue for me when I was using this method but could be an issue for others.
CLS / Cumulative Layout Shift and FOUC / Flash of Unstyled Content
Because it loads the content from the repeater first then formats/styles the content there is a good chance it will cause CLS and/or FOUC. Solution can be to have a set size for the menu container and show something else on top of it until after the script is finished running.
Menu depth greater than 3
The script I’ve written really only goes down 3 levels (1 top level, 2 sub-levels) so if you need more levels you can add more logic to the script to keep track of the item being processed or just get an actual library that knows what its doing.
End
This thing isn’t perfect but it did the job I needed it to do, which was allow the client to change one 1 menu and have it affect multiple parts of the site.
If you have any questions you can DM me on twitter @robchankh or leave a comment on FB where I’ll post this.